Showing posts with label Window Furnishings. Show all posts

Thursday, September 8, 2011

The things we have learned

For novices who seriously had very little clue about the whole house builing process, I think we did okay however we did learn a few things along the way...

(1)  Go over your contract & drawings with a fine tooth comb.  Then go over them again.  And again.  Each time we went over our drawings we'd pick up something new! 

Pay particular attention to the little things like which way you want your doors / shower doors to swing, are your windows centred on the drawings, are your window heights all level with each other, are the heights of your openings the height you would like (we wanted 2340mm square set openings like the display house but the standard was lower, there wasn't any extra cost to raise them). 

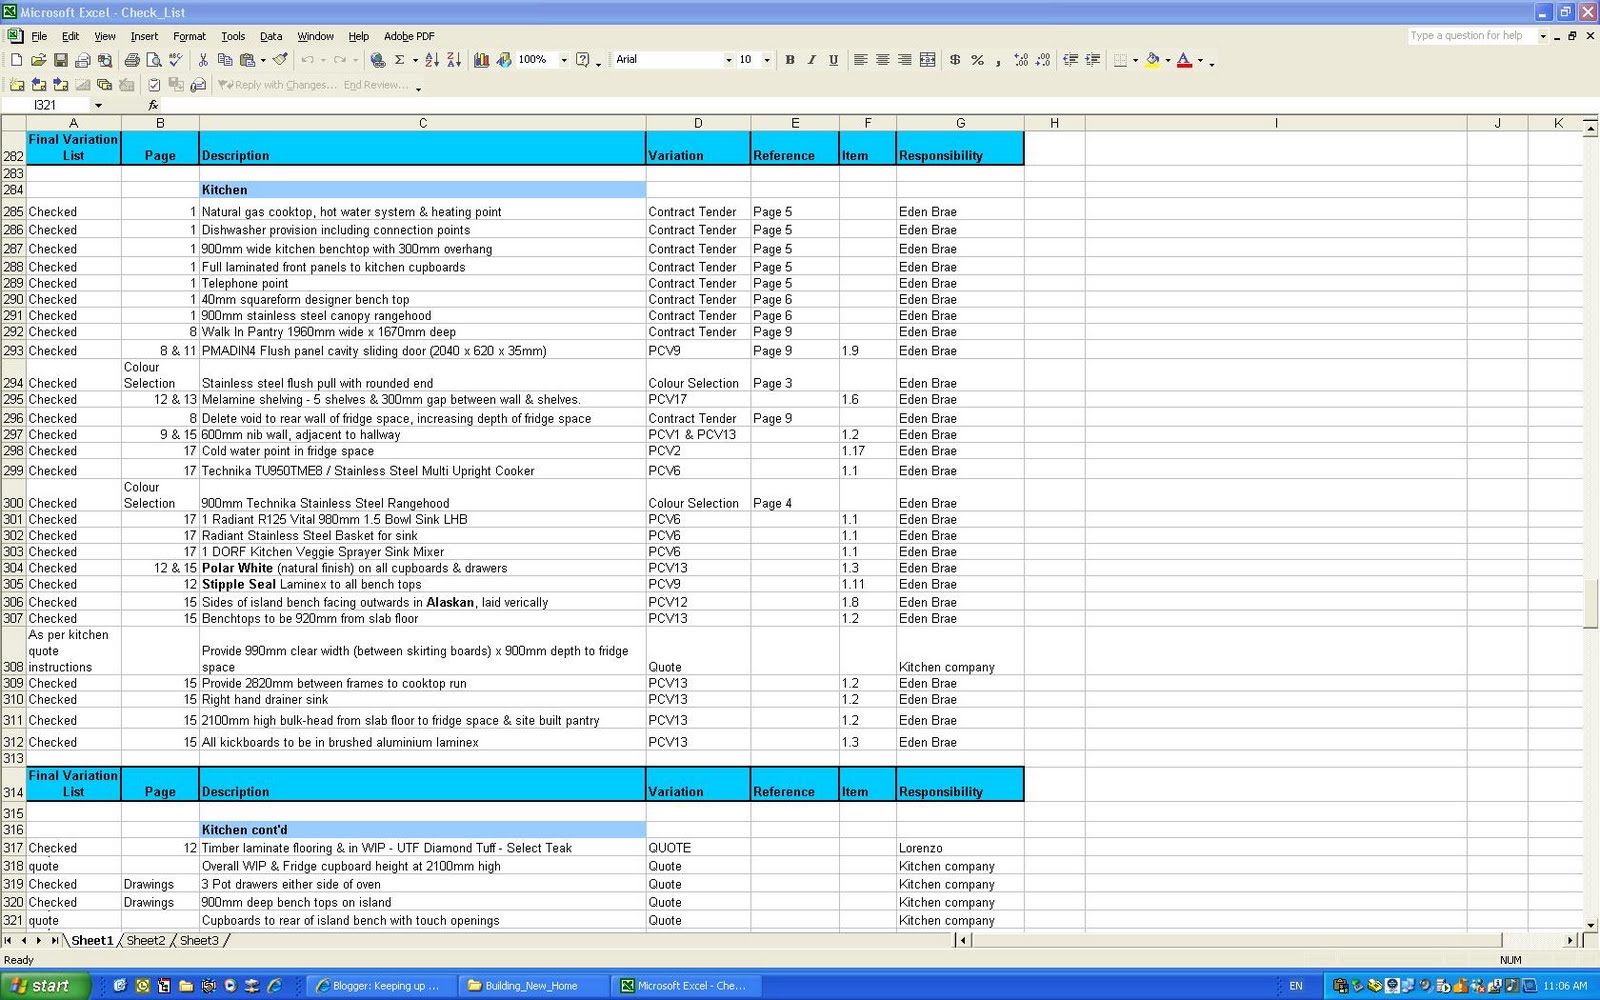
We had so many variations that I ended up doing an excel spreadsheet (snapshot below) and went through each page of the contract, room by room and noted what should be in each space.  This really came in handy at walk through when our SS had one thing noted and I had another as I could tell him exactly where the written instruction could be found.  Also made life so much easier for us knowing exactly what was meant to be where.  So many months pass from when you originally choose things that it can be easy to forget exactly what door knobs you selected...


(2) Turn on the '"read recepit" on your email. Helpful to know that your emails have been read if you haven't received a response.


(3)  When you're in the contract stage and adding things in, changing things around etc, liaise with your Customer Service Consultant by email so everything is in writing.

(4)  Have you made your windows larger?  Can be difficult to get certain window furnishings.  We found that with our 2600mm wide windows in living areas.  A lot of blind fabrics only span 2400mm.  In the end we chose to "rail-road" the fabric which means the fabric hangs the other way and it's ok but it does have a slight ripple effect to it.  Hardly noticeable in the sheer fabric but was quite obvious in the blockout blinds they had accidentally first installed.

Sheer fabric


Block-out fabric


(5)  If you choose timber flooring, you might want your internal doors to be a little longer.  We found out too late that the internal doors allow for carpet so they sit about a good inch off the finished floor level.  Not the end of the world but I would have definitely chosen better fitting doors had I known.

(6)  If you raise the height of your ceilings, you may want to increase the height of your doors too.  We didn't worry about the bedroom doors but for the front door and the granny flat which has the internal door in the Entrance Hall with a ceiling height of about 2900mm we raised the door sizes accordingly.  It would have looked ridiculous otherwise.

(7)  If you are on recycled water, the standard inclusion is 1 recycled water tap. Don't assume you automatically get one at the front and back of the house like we did.

(8)  Get yourself a good Mortgage Broker, it makes all the difference sometimes in getting the loan for the amount you want or getting the best deal.  Hey, we all try and push the limit don't we?   We used Kevin Lee from Smartline and we did everything over the phone, fax & email.  He was great and it was so convenient.


(9)  And last but definitely not least, read this thread from the Homeone Forum.  It's 18 pages of other people's hindsight!


And we all love a bit of hindsight!

Friday, July 1, 2011

Blinds & shutters!

I went to the house this afternoon with great anticipation as I saw the Abbey Blinds & Shutters van at the house this morning.  When I got there I kicked a major goal as I was able to be let in by someone who had a key!!  Yipee!

House was a bit dark and not all rooms have globes / working lights yet and I only had my phone to take pics, so apologies for the quality of the pics but here goes...

We got shutters in each of our bedrooms (more about that here). This is one of the boy's rooms.


Here's our bedroom


From another angle with better light


The photo's don't do them justice, I had a colorbond moment when I walked in the room!  I just LOVE them!! 

In our living areas we chose sheer blinds because generally we just want nice, big, un-obstructed windows during the day to let lots of light in.  The blinds are really there for privacy at night and the sheer fabric enables some light to filter in during the day if needed but you can't see through them at night.

Problem.  They've gone and put block-out blinds throughout.  Sigh...

Not the greatest pic but you get the idea.  Should all be good though, it states "sheer" on the signed quote and at least in the meantime while we wait for their replacement, we'll have some privacy.


The Tyrrell's Inspector also came out today.  I noticed some of his green tape around marking a couple of things we missed.  I'm looking forward to seeing the report next week.


Paint touch ups were meant to happen each day this week however nothing has been done yet.  Has probably worked out for the best though as Tyrrell's have pointed out some extra things anyway.  I think we've also been waiting for the Carpenter to re-fix the skirting (after they were removed to put floor boards down) and make our internal garage step before painting happens.  Our SS indicated they should be there over the weekend.  Hopefully anyway. 

Neeeeeearly there!

Tuesday, May 3, 2011

Window treatments

Today we signed the dotted line for our blinds and shutters with Abbey Shutters.  Nicole at Home Option Gallery was super helpful!  We've been going back and forth for quite a while now trying to get it right, so it's nice to have it all sorted.

We've chosen cedar wood plantation shutters painted in Taubmans Crisp White (which is also the colour of our architraves) for our bedroom and the boy's bedrooms.  We've gone with the 90mm blade and the reverse wand.  Our reasons for choosing shutters for these rooms are:

  • Good insulation - our bedrooms will cop most of the summer sun. 
  • Block out qualities - keep the rooms nice and dark for sleeping (especially for those early risers!) 
  • Can angle them to get the best light but not have to look at the rather plain and close fence
  • Helps to block out sound
  • Look fabulous!
Here's an idea of what we're getting


In our living areas, it was a little tricky to work out what to do as we have so many windows.  We contemplated shutters for these areas but thought it would end up looking too much (let alone the $$$ it would cost!!!)  In the end we decided on sheer blinds.  With the good orientation on the block and our eaves, we're hoping the blinds will be up majority of the time anyway, so we're mainly after privacy at night.

The blinds we chose are called Ash by Mercury and have a nice texture to them. I like that they offer a bit of contrast to the paint colour we've chosen too.  

Abbey Blinds supply a stainless steel chain which is fixed to the architrave (for child safety) and there'll also be an aluminium oval rod at the bottom of the blinds.  Because some of our windows are pretty large, Abbey are going to put "spring assist" in too which makes them lighter to pull up.  Over the bi-fold doors, each side will have 2 blinds which will be linked and therefore go up or down simultaneously.

Here's a swatch of our blind (left), Antique White paint swatch (right) and Crisp White for all the trims (middle)


Everything we've chosen is Australian made which is kinda cool and all looks like really nice quality.  

Best bit is that they have an arrangement with Eden Brae so everything will be installed before handover!!


Wednesday, June 23, 2010

Colour Appointment

Well it's been a while between posts however apart from signing our life away - I mean contract, a couple of weeks ago not much has been happening unless you count moving house (to my Mum's while all this house building business is going on) and the endless hours of 'homework' such as multiple trips to PGH Bricks etc to work out our colours!

Packing our life away into storage! Couldn't have squeezed another thing in there! Thanks for your help Steve, Steve, Mark & Jules!


However, yesterday we had our day at Home Option Gallery (HOG) to choose all of our internal & external colours, along with kitchen design and so on.  We were prepared for a pretty full on day and in the end we were there for 6 hours but it all went really smoothly (much to our surprise).

We didn't go to the 'HOG' feeling overly confident based on a lot of feedback from fellow builders but our Colour Consultant Josie was excellent.  Everyone else we saw were also very helpful and prepared.  Each time we sat down with someone new to discuss something we felt they'd already looked over our plans and were familiar with it all before going over things.  As for our kitchen appointment (which is the area we'd heard the most negative comments) - it was ok - not a lot of forthcoming advice or recommendations but we had a really good idea of what we wanted and together we got the end result (nervously awaiting the quote now though!!!).

So, here is what we chose:

External
Bricks - Gravel (with off white 'ironed' mortar)
Roof tile - Wild Rice (traditional profile)
Cladding - Woolooware
Gutters - Dune
Fascias, down pipes & meter box - Jasper
Front door, timber bi-folds & timber french doors -walnut stain
Windows, eaves & garage door - Surfmist

Our bricks and roof tile


Internal
Walls - Antique Ivory by Taubmans
Skirting & Architraves - Elusive White

Below, you can see our colorbond colours on top left - Jasper, Dune & Surfmist.  The Woolooware coloured cladding is top right and our internal wall colour Antique Ivory and Elusive White for trims is just under that.  On bottom right are our bathroom vanity colours.  Ignore the 2 colours in bottom left, they were the original kitchen colours that we've since changed to below...


Kitchen (also see here for our latest plans)
Island Bench - All lower cupboards / drawers & back of Island bench - Alaskan laminex
Drawers & upper cupboards along back wall - Polar white laminex 
Squareform benchtops - Stipple Seal laminex (will replace with Essastone later on)
Splashback - VM319 Metal Blend / Natural Stone (as seen below)


Close up of splashback colours 


Notice our rear opening cupboards on island bench below?

Bathrooms - See pics in Floor / Tiles post.
All floating vanities - Polar White laminex in main bathroom and horizontally laid Fudge Stream laminex (in ensuites)
Squareform vanity bench tops - Pure calcite laminex (again may replace with Essastone later)
Wall & Floor tiles - see below.

Here's the Fudge Stream laid horizontally with a similar coloured bench top.  Both ensuites will have this vanity.  The main bathroom is going to have a polar white vanity as I didn't want it to compete with the feature tile all around the bath tub.


Another pic. Will probably date in 3 minutes but hey, we like it! 


A bit of a jumbled photo but the top middle tile is our bathroom floor tile and the long, thin mosaic tile will be laid horizontally up the front of the bath and on top of bath hob.


Window Furnishings
Thinking of plantation shutters in all bedrooms and sheer blinds in all living areas.  We were going to do it the other way around however we can't really do shutters on our bi-folds and we want lots of light in our living areas and thought that all the shutters may actually cut a fair bit of that light out.  The girls from Abbey blinds are giving us a quote and from prices they mentioned on the spot, they seemed pretty reasonable.

Floor Coverings - see latest post
Yet to have our Dilorenzo appointment however we're pretty certain we're going with the 'Teak' laminated flooring - beautiful colour and very hardy.  There are so many options when choosing a 'wooden' look flooring but we don't have a lot in our budget to pay for real wooden flooring and having young boys the laminate will be nice & hard wearing.  Basically we wanted the warmth from the look of wood and are happy that we'll achieve that with this flooring.  Will come back & update once we've finalised wet area floor tiles & carpet.


Upgrades & approximate pricing
Off white mortar - $250
Stain to front timer door instead of paint - $250 (same front door as below)
Flyscreens for all opening windows - $500
Parent Retreat Entry Door - feature door - can't recall exactly but around $150
Solid door & deadlock from garage into house - $200
Privacy lock to main bathroom - $30
Freestanding 900mm oven - $750
1700mm bath instead of 1500mm - $40
All toilets to next model up - $25 each
Kitchen tap - Dorf vege sprayer - $200
All showers to frameless - between $300 - $500 each
3 coats of Taubmans living silk paint (1 undercoat & 2 coats of living silk) - $1500
Double towel rails instead of singles - $20 each
Converting all shelving in pantry / wardrobes to malamine - $500
Sound proof bats in walls between my Father's bathroom and our living room and also between the laundry and our bedroom - $500


                Our beautiful front door will look exactly like this!


Our beautiful french doors


We were going to get some heated towel ladders in our ensuite and main bathroom however at $740 each plus the cost of installation and the cost for power - we've since realised you can do it for around half the price after handover.

Re wardrobes, still deciding in our WIR whether we'll get any shelving as we are most likely going to fit it out ourselves afterwards.  

Kitchen - I've come back to edit this a few weeks later now that we have our quote.  We've gone back & forth a few times with the kitchen people but in total we're spending around $6,200.  This includes:
  • over head cupboards (with light boxes for downlights) above 'cook run' (back bench with oven)
  • bulk heads above cupboards
  • 3 large pot drawers on either side of oven (instead of cupboards)
  • 900mm wide island
  • rear opening cupboards on island behind sink and corner space which otherwise would be dead spaces 
  • wider cuttlery drawers 600mm instead of 450mm
  • Bin drawer with 2 bins in it (this was just over $600 alone! cough cough)
The $6,200 does not include the cost for oven, sink or tap upgrade.  Nor does it include a dishwasher.  I didn't want the crapola one they offer (for a cost of course).  I actually want one that cleans dishes, so we'll put one in after handover.

What we had to miss out on due to the extortionate costs from Kitchen Company - Essastone bench tops & soft close cupboards & drawers (total of these 2 things were $10,000 and while soft close mechanisms can't be retrofitted, we know Essastone would be a LOT cheaper to do ourselves....one day!)  Oh and forget the polyurathane cupboards unless you feel like spending an additional $6000 or so!!!!
Related Posts Plugin for WordPress, Blogger...